How to connect WooCommerce with easySales: a complete integration guide

Connect your WooCommerce store with easySales in three steps — start the wizard in easySales and download the plugin, install it on WordPress, then paste the token back into easySales to finish. Centralize orders, sync stock, generate AWBs and invoices, and reuse the same catalog as offers on every marketplace you sell on.
Why connect WooCommerce with easySales
Sell on WooCommerce and want one place to manage orders, generate invoices, push AWBs to couriers, and reuse the same products as offers on marketplaces? easySales handles all of it from a single dashboard.
Once connected, easySales pulls products and variations from WooCommerce and centralizes incoming orders. From there you generate invoices, create AWBs with any supported courier, and turn those products into offers on eMAG, Allegro, Kaufland, Trendyol, and 80+ other channels. Stock and order status stay in sync in both directions.
You'll start the wizard in easySales, download the easySales plugin, install it on WordPress, then paste the token from easySales back into the plugin — no code, no developer access, no theme changes.
How the WooCommerce connector works
easySales connects to WooCommerce through a small WordPress plugin you download from your easySales account and install on your WordPress site. The plugin exposes a private endpoint that easySales calls to read your catalog and orders, and registers two webhooks so order and stock changes reach easySales in near real time.
The plugin never connects out. easySales talks to it, authenticated with a per-website token that easySales generates for you. WooCommerce credentials, API keys, and database access stay inside your WordPress install.
Interactive tour
Don't feel like reading? Take the interactive tour.
Prerequisites — what to prepare before you start
A few requirements keep products from being skipped at import and webhooks delivering reliably.
WordPress admin access
You need admin permissions on the site to install the plugin and read the generated token.
WooCommerce installed and active
The connector targets WooCommerce-managed products and orders. A plain WordPress install without WooCommerce is not supported.
HTTPS and public reachability
WooCommerce webhooks deliver to easySales over HTTPS only, and the site must be reachable from the public internet — not behind HTTP basic auth, IP allow-lists, or "coming soon" plugins.
Unique SKU per product and variation
Two products with the same SKU collide — only one is imported. Audit and de-duplicate before connecting.
A few things worth knowing upfront:
- Each product (and each variation) needs a unique SKU. If two products share the same SKU, only one is imported.
- easySales tracks products by SKU. Renaming a SKU in WooCommerce creates a fresh product in easySales — to find duplicates, use the export button in Online Shops → Products.
- HTTPS is required — WooCommerce webhooks won't deliver to easySales without it.
- The site must be reachable from the public internet. Staging behind HTTP basic auth, IP allow-lists, or "coming soon" plugins blocks webhook delivery silently.
Step 1 — Start the wizard in easySales and download the plugin
In easySales, go to Integrations → Online Shops → Connect Website, then select WooCommerce. The wizard opens on the Download Module step.
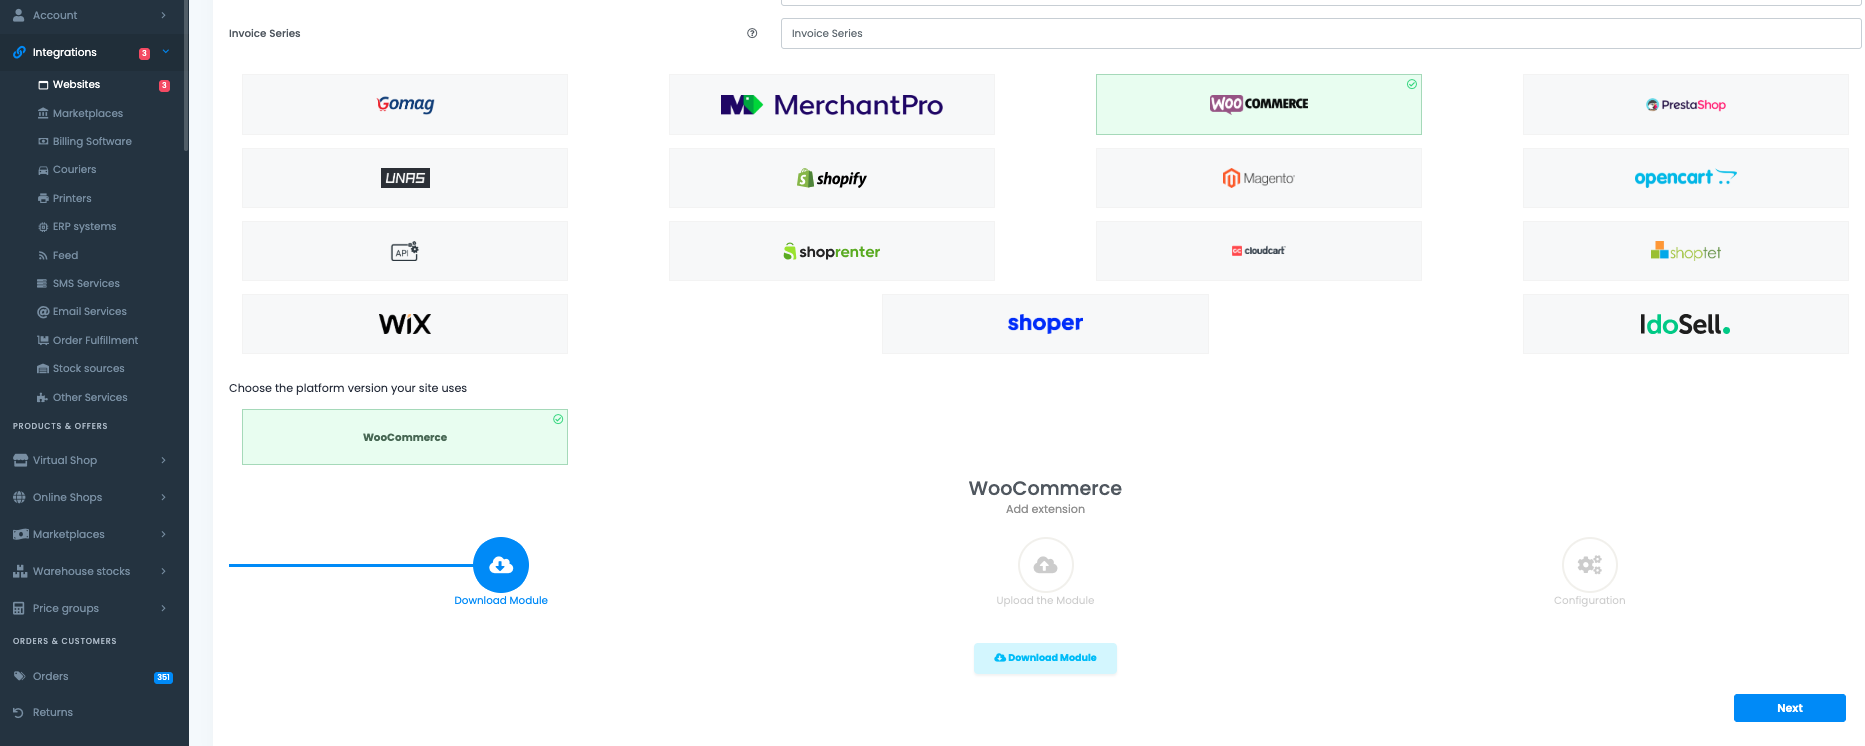
Click the download button to grab the plugin archive (easysales.zip). Keep this tab open — you'll come back to it in Step 3 to finish the configuration.
Step 2 — Upload and activate the plugin in WordPress
In your WordPress admin, go to Plugins → Add New → Upload Plugin. Upload the easysales.zip archive you just downloaded, click Install Now, then Activate.
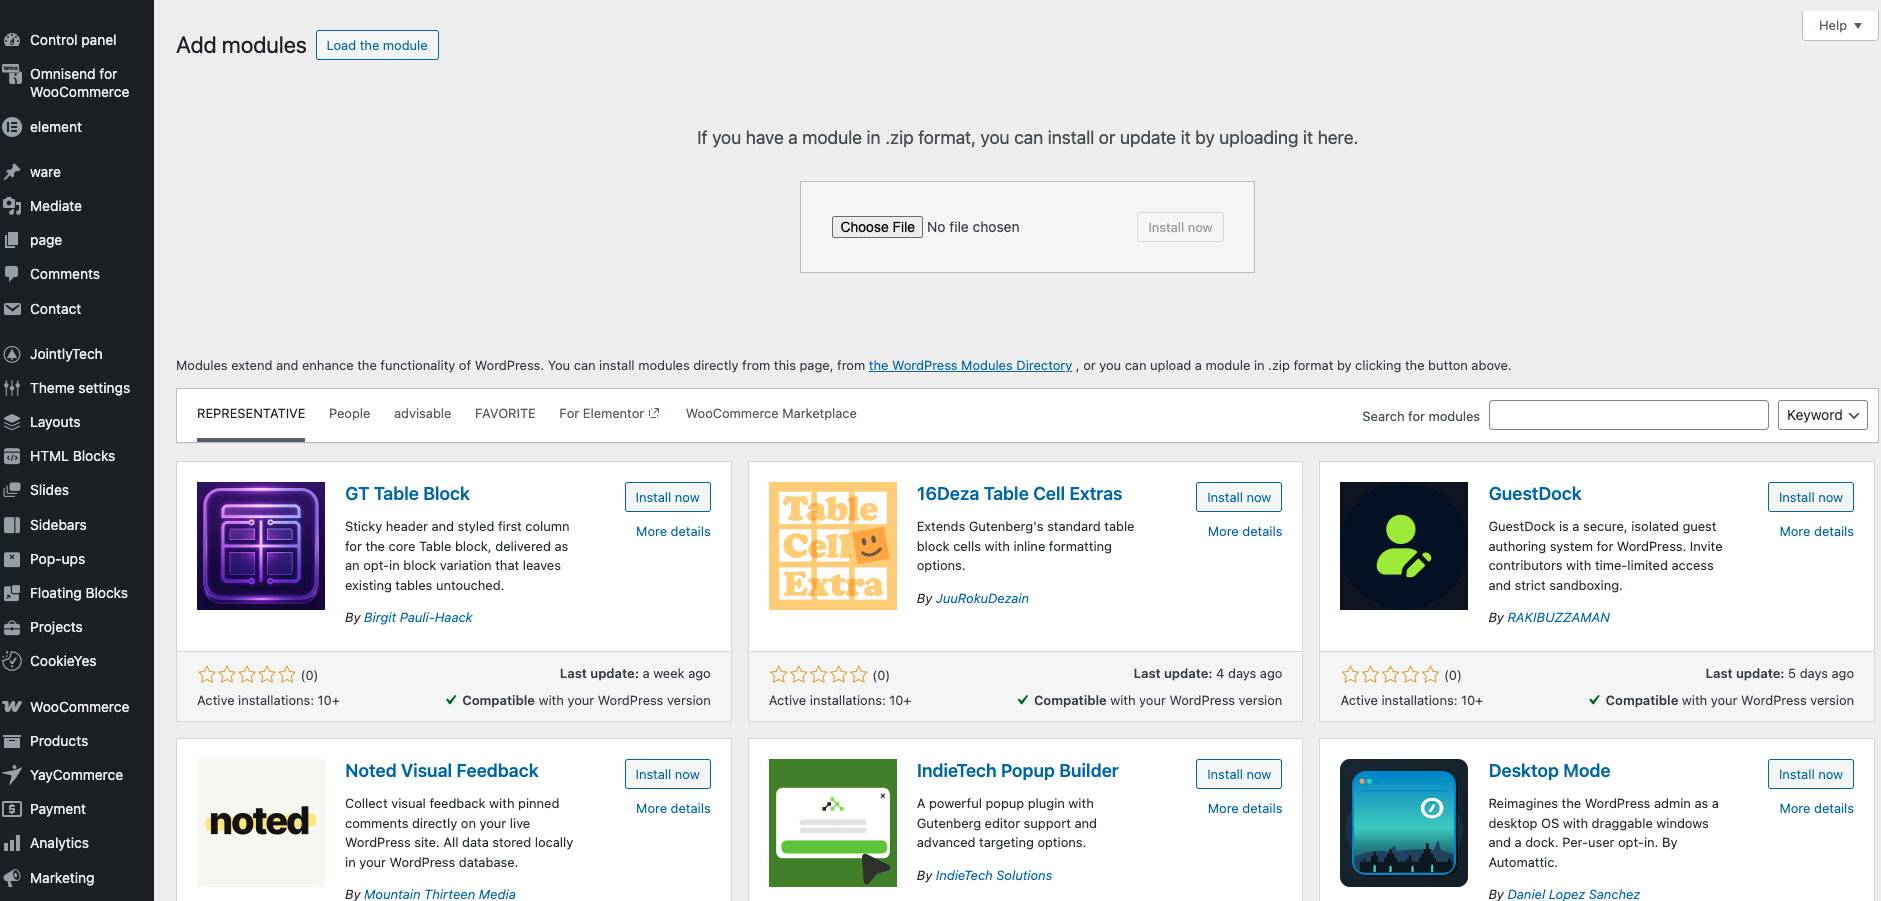
After activation, an easySales menu item appears in your WordPress sidebar (some themes show it under WooCommerce → easySales instead). Open it. You'll see a Token field — leave the tab open, you'll paste the token from easySales here in the next step.
Step 3 — Configure the site in easySales and paste the token in WordPress
Return to your easySales tab. The wizard is now on the Configuration step and displays your generated token.
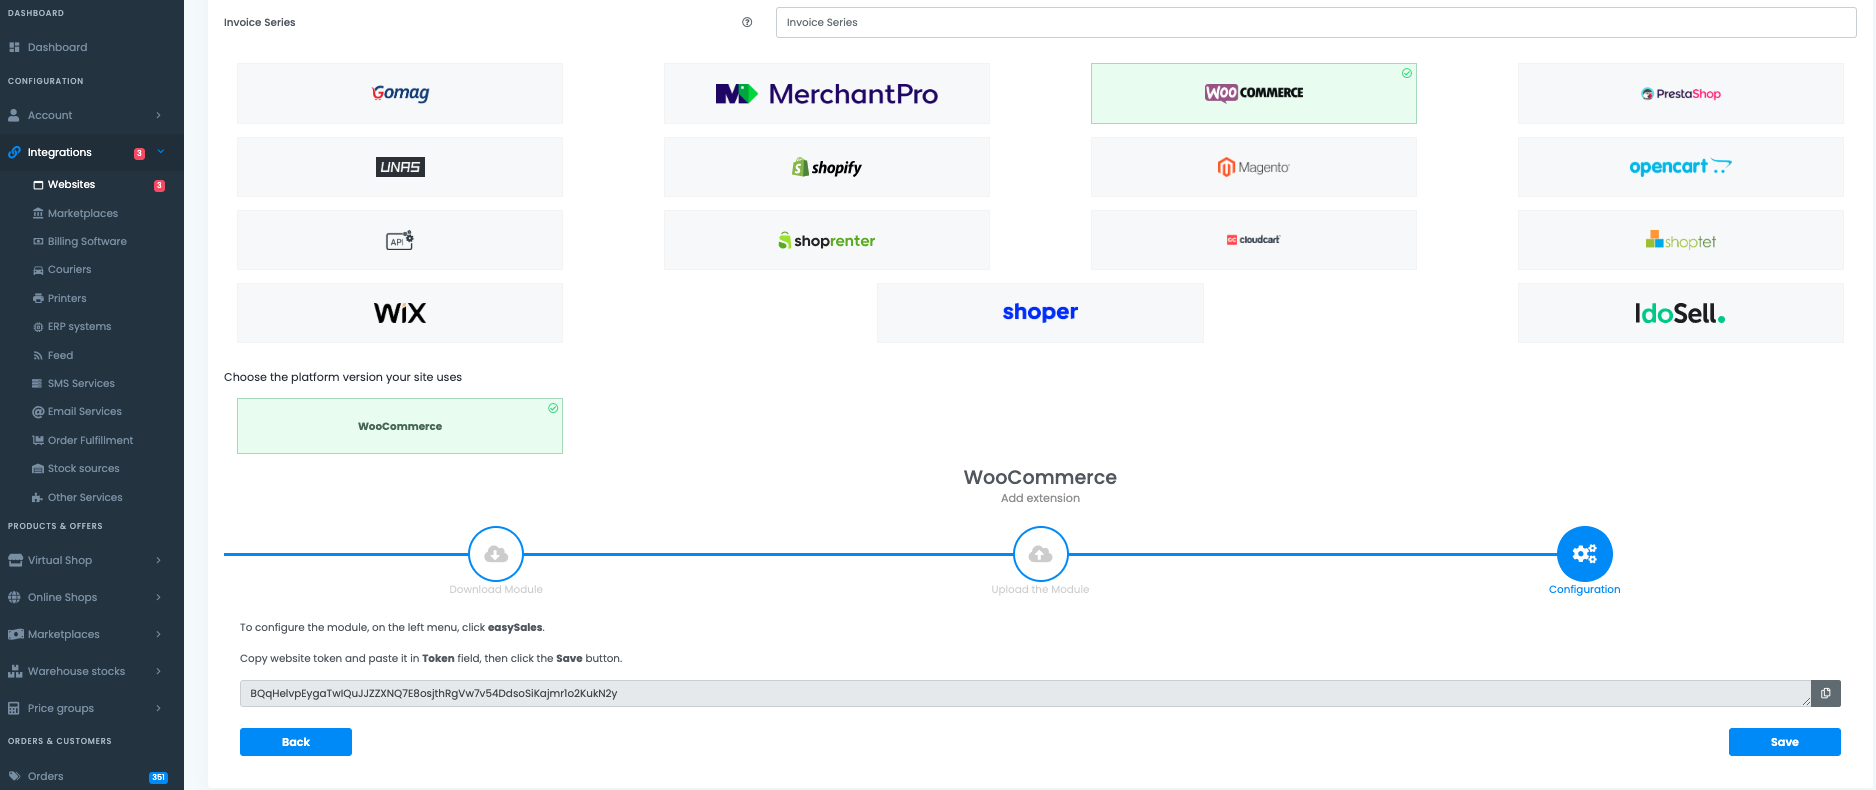
Copy the token shown in easySales, switch to your WordPress tab, paste it into the Token field in the easySales plugin settings, then click Save in WordPress.
Back in easySales, finish configuring the site. The form below the wizard collects everything easySales needs to drive the integration.
Website name and URL
- Website name — a label you choose. Only visible inside easySales.
- Website URL — your WooCommerce storefront. Use the exact URL where WordPress runs, including
https://and thewwwprefix if your domain uses it. If WordPress lives in a subdirectory (example.com/shop), include it.
VAT and VAT for shipping
If you're a VAT payer, enter the rate for your products and a separate rate for shipping (e.g. 21 for 21%). Leave blank if you're not.
Language and currency
Pick the storefront language (Romanian, Bulgarian, Hungarian, Polish, or English) and currency (RON, BGN, HUF, PLN, or EUR). These act as defaults for imported products and as a fallback when an order doesn't carry an explicit currency. They never override individual orders — each order keeps the currency WooCommerce reported.
Product stock source
The most important decision on the form. It tells easySales where the authoritative stock value lives:
- Website — WooCommerce is the source of truth. easySales reads stock from WooCommerce and never overwrites it.
- easySales — easySales is the source of truth. Stock changes inside easySales (sales, manual edits, marketplace deductions) are pushed to WooCommerce.
- Connected integration — your stock lives in a third-party system already wired to easySales (billing software like SmartBill, Oblio, Fakturownia or FacturisOnline; an ERP such as NexusERP or Sedona; a fulfilment partner like Fulfillro or Huboxx; and many others). easySales reads stock from that integration and pushes it to WooCommerce. Connect the integration and declare its warehouse first — you can't pick this option otherwise.
Running a multi-warehouse operation? Switch to Advanced warehouse mode. Instead of binding the store to one stock source, pick one or more easySales warehouses and define how their stock is aggregated, prioritized, or split per channel. The standard setup when the same catalog ships from several locations or channels draw from different warehouses.
Default package type
Used at AWB generation when the order doesn't specify a package. Pick the type that matches most of your orders.
Click Save. easySales tests the connection, registers the webhooks on your WooCommerce site, and starts importing your catalog.
What happens automatically after you save
easySales handles webhook setup and the initial import automatically.
- Two webhooks are registered on your WooCommerce site: one for order changes and one for stock changes. Every order created, updated, cancelled, or paid in WooCommerce reaches easySales in near real time, and the same applies to stock updates.
- Your product catalog is imported — products and variations appear in Online Shops → Products, where you can browse, edit, and turn them into offers for marketplaces.
- Incoming WooCommerce orders appear in your Orders screen, where you generate invoices, AWBs, and run automation flows.
- Stock syncs according to the source you picked. If you chose easySales, stock pushes start running continuously and your WooCommerce storefront reflects centralized inventory.
| From WooCommerce → easySales | From easySales → WooCommerce |
|---|---|
| Orders (create, update, cancel, paid) | Stock updates |
| Products and variations | Order status changes |
| Stock levels | Fulfillment status from AWB generation |
| Product prices | — |
| Categories | — |
| Order metadata (custom checkout fields) | — |
| Customer details and addresses | — |
| Locker IDs (any supported locker plugin) | — |
Fine-tuning your WooCommerce connection
After saving, open the WooCommerce website's Preferences tab. Settings are grouped in three blocks.
WooCommerce Settings
- Import order metadata — pick which WooCommerce order meta keys are copied onto easySales orders as metadata. Useful for custom checkout fields, marketing source tags, and integrations like Innoship Curie or GLS that store the courier choice in order meta.
- Customer field overrides — map non-standard WooCommerce customer fields (added by Romanian B2B plugins like WooCommerce Pentru CIF) onto the easySales customer record. Avoids the common case where a person ID gets imported as a VAT code.
- EAN field key — name of the WooCommerce meta field that stores the EAN/barcode. The plugin imports it onto products so it can be sent forward to marketplaces.
- VIES VAT label — read the VIES-validated flag from WooCommerce orders into easySales (used by Romanian B2B sellers).
Order Behavior
- Allow reopening completed orders — by default, terminal statuses like "Completed" cannot revert to "New". Enable if you need to reopen orders.
- Allow reopening cancelled orders — same logic for cancelled orders (useful when a temporarily cancelled unpaid order is finally paid).
Synchronization
- Fetch orders — automatic import of new WooCommerce orders.
- Update order status on WooCommerce — push status changes from easySales back to WooCommerce so both systems stay in sync.
- Update product stock on WooCommerce — push easySales stock levels to your WooCommerce storefront. Turn off if WooCommerce is your stock source.
Click Save at the bottom of the page to apply your changes.
Variations, lockers, and other WooCommerce quirks
A few WooCommerce-specific behaviors worth knowing:
- Product variations. easySales imports the parent product and each variation as separate entries. Each variation needs its own SKU. The parent provides the title, description, images, and characteristics; variations carry their own price, stock, and attribute values (size, color, etc.).
- Lockers. If your shop uses any supported locker plugin — across any country or carrier (InPost, Sameday EasyBox, Fannbox, and others) — easySales reads the locker ID from the order meta automatically. No configuration needed. The locker is then used as the delivery point at AWB generation.
- Courier add-ons (GLS, Innoship Curie, Sameday). Courier choices stored in WooCommerce order meta can be read into easySales metadata via the Import order metadata setting above, then mapped to the corresponding easySales courier in your automation flows.
- Custom themes and hooks. Heavily customized WooCommerce setups sometimes wrap or override order data through theme functions. If a field doesn't appear in easySales as you expect, the Raw metadata diagnostic in the plugin settings shows you exactly what easySales receives for a given order.
You're connected — what's next
Once orders start arriving, the next step is automation. Set up flows to generate invoices, create AWBs, and send tracking notifications. If you also sell on marketplaces, turn your WooCommerce catalog into offers and let easySales push them out.
Connect your WooCommerce store in minutes
Try easySales free for 14 days. No credit card and no code changes.